Monday, March 28, 2016

Butter Cake with Strawberry Sauce

(pic courtesy Jenny Evans Gatherings)

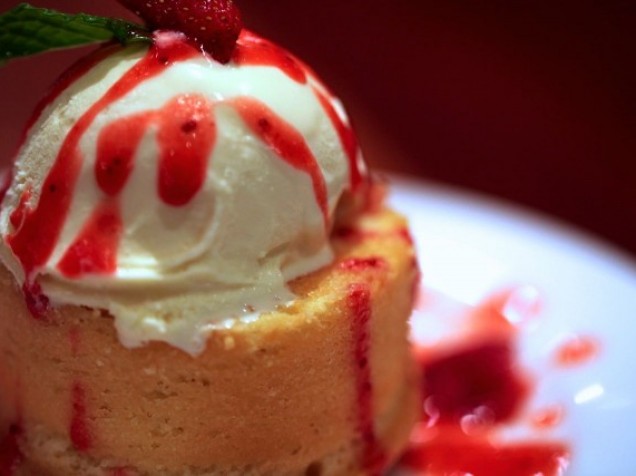
I don't have words to describe how incredibly delicious this was. So, I'll just say it was melt-in-your-mouth, buttery perfection. Seriously one of the best desserts I've ever had in my life. If you want to blow the socks off of someone, make this.

Butter Cake with Strawberry Sauce
from Jenny Evans Gatherings 

Cake:
8 – 6 oz. ramekins
raw turbinado sugar (any raw sugar or Sugar in Raw), to coat the bottom of the ramekins
1 c. unsalted butter, softened
2 oz. cream cheese, softened
1 c. granulated sugar
¼ tsp. baking powder
¼ tsp. baking soda
1 tsp. salt
2 tsp. vanilla extract
1 egg
½ c. buttermilk
1 ½ c. all purpose flour
8 fresh strawberries, sliced (optional, for garnish)
mints leaves (optional, for garnish)

Cream cheese layer:
4 oz. cream cheese, softened
½ c. granulated sugar
1 egg
1 ½ tsp. vanilla extract

Strawberry Sauce:
2 c. strawberries, fresh or frozen
¼ c. granulated sugar
1 Tbsp. fresh lemon juice

Cake:
Preheat the oven to 325 F. Prepare the ramekins by generously coating the bottom and sides with cooking spray. Put 2 teaspoons of the turbinado sugar on the bottom of each ramekin. Swirl the sugar along the lower ½ inch and bottom of each ramekin.
In the bowl of a stand mixer, cream the butter, cream cheese and sugar. Beat for 30-60 seconds. Add the baking soda, baking powder, salt and vanilla extract; Mix well. Add the egg and beat for 30-60 seconds. Add ½ cup of the flour. Beat for 30 seconds. Add half of the buttermilk. Beat for 30 seconds. Add another ½ cup of the flour. Beat for 30 seconds. Add the other half of the buttermilk. Beat for 30 seconds. Add the last ½ cup of the flour and beat for 30 seconds.

Cream Cheese Layer:
Beat all the ingredients in a small bowl until combined. Do not overbeat.

Strawberry Sauce:
Place all the ingredients in a blender and blend until smooth. Store in the refrigerator.

Assembly:
With an ice cream scoop, place two even scoops of the cake batter in each ramekin. Top with about 2 tablespoons of the cream cheese layer.
Bake in a 325 F oven for 30 minutes or until the top is golden and a toothpick comes out clean when inserted.
Let the cakes cool for 10-15 minutes. Gently turn them over onto a dessert plate to release them from the ramekins. Top with a scoop of vanilla ice cream. Drizzle the strawberry sauce over the ice cream, cake and plate. Garnish with sliced fresh strawberries and a mint leaf. Serve warm. (You can also serve the cake in the ramekins.)

Cheesy Au Gratin Potatoes

Cheesy Au Gratin Potatoes(pic courtesy Mel's Kitchen Cafe)


I think Christian consumed 3,000 calories of these. He literally ate half the pan. They were soooo yummy! Oh, and I didn't have all of the cheeses she called for, so I just used medium cheddar and parmesan cheese (shredded) and it was delish!

Cheesy Au Gratin Potatoes
from Mel's Kitchen Cafe 

Note: the key to this dish is the evenly sliced potatoes. It will be nearly impossible to accomplish this feat by hand, since the potatoes need to be sliced 1/8-inch thick. I don’t have a mandoline, which would work perfectly, however, a slicing disk on a food processor/shredder works great and in a pinch, I’ve used the slicing side of my box grater.
Ingredients
  • 1 1/4 cups shredded sharp cheddar cheese
  • 1 1/4 cups shredded Monterey jack cheese
  • 1/2 cup grated Parmesan cheese
  • 2 teaspoons cornstarch
  • 3 pounds russet potatoes, peeled and sliced 1/8-inch thick
  • Salt and pepper
  • 3/4 cup heavy cream
  • 1/2 cup low-sodium chicken broth
Directions
  1. Preheat the oven to 350 degrees and adjust an oven rack to the middle position. In a large bowl, toss the cheeses and cornstarch together until evenly coated.
  2. In a large gratin dish (about a 2- to 3-quart dish), shingle half of the potatoes. Sprinkle the potatoes evenly with 1 1/2 cups of the cheese mixture, 1/2 teaspoon salt, and 1/4 teaspoon pepper. Top with the remaining potatoes, shingling them neatly and evenly. Sprinkle another 1/2 teaspoon salt and 1/4 teaspoon pepper evenly over the top.
  3. Combine the cream and the broth in a large measuring cup and pour the mixture over the potatoes. Top with the remaining cheese mixture and bake until golden brown and a fork inserted into the center slides in easily with little resistance, 75 to 85 minutes. Let the potatoes cool for 10 minutes. Serve.

Roasted Maple-Glazed Pork Tenderloin

Roasted Maple Pork Tenderloin (pic courtesy of Mel's Kitchen Cafe)

 I am not a huge fan of ham, so I decided to make pork for our Easter dinner last night. This recipe did not disappoint. It was seriously amazing. I loved the sweet and savory flavors. And it was so fast and easy!


Roasted Maple-Glazed Pork Tenderloin
from Mel's Kitchen Cafe 


Ingredients
  • 1/2 cup pure maple syrup (not imitation or pancake syrup), divided (meaning you'll use half at first and save half for later in the recipe)
  • 1/4 cup molasses, light or mild
  • 1 tablespoon red wine vinegar
  • 1/4 teaspoon smoked paprika
  • 1/4 teaspoon ground ginger
  • 1/4 cup cornstarch
  • 2 tablespoons sugar
  • 1 tablespoon table salt
  • 2 teaspoons ground black pepper
  • 2 pork tenderloins (1 1/4 to 1 1/2 pounds each)
  • 2 tablespoons vegetable, canola or coconut oil
Directions
  1. Preheat the oven to 375 degrees F. Stir 1/4 cup maple syrup, molasses, vinegar, paprika and ginger together in a liquid measuring cup or bowl; set aside.
  2. Whisk cornstarch, sugar, salt, and black pepper in small bowl until combined. Transfer the cornstarch mixture to a rimmed baking sheet. Pat the pork tenderloins dry with paper towels, then roll in cornstarch mixture until evenly coated on all sides. Pat or shake off the excess cornstarch (really important or the excess coating can get gummy).
  3. In a 12-inch nonstick skillet, heat the oil over medium-high heat shimmering and hot. Place both tenderloins in the skillet, leaving at least 1 inch in between and cook until well browned on all sides, 5-6 minutes total.
  4. Transfer the tenderloins to a lightly greased oven-proof wire rack set in rimmed baking sheet. If you don't have a rack that size, the tenderloins can be placed on a lightly greased baking sheet - the coating on the undersides of the pork may be a bit soft after baking but it will still work fine.
  5. Pour off any excess grease/fat from the skillet and return it to medium heat. Add the syrup mixture to the skillet, scraping up any browned bits with a wooden spoon, and simmer the mixture until it is reduced slightly, 1-2 minutes.
  6. Transfer 1 1/2 tablespoons of the hot glaze to a small bowl and set aside. Using the remaining glaze, brush each tenderloin with approximately 1 tablespoon glaze. Roast the pork for about 15-20 minutes, until an instant-read thermometer inserted in thickest part of tenderloins registers 130 degrees. Brush each tenderloin with another tablespoon glaze and continue to roast another 4-6 minutes until an instant-read thermometer inserted in thickest part of tenderloins registers 135 to 140 degrees. Remove the baking sheet from the oven and brush the pork with the remaining glaze. Let the pork rest for 10 minutes.
  7. While the tenderloins rest, stir the remaining 1/4 cup maple syrup into the reserved 1 1/2 tablespoons glaze (you may need to warm the reserved glaze slightly if it has thickened). Brush each tenderloin with the glaze (it's ok if there is some remaining; read on). Slice the pork into 1/4- to 1/2-inch slices and serve with the remaining glaze.

Chocolate chip energy balls

Chocolate chip energy balls (no bake)
Adapted from the healthymaven.com

1.5 c rolled oats
1/2 c protein powder (I used chocolate)
1 t cinnamon
2 T flax or chia seeds
1/2 C smooth peanut butter (or any nut butter)
3T honey
1/3 C chocolate chips (I used mini so they would go further)
2-4 T liquid (water, milk, almond milk)

Mix all dry ingredients except for chocolate chips. Add PB and honey and liquid. Stir in chocolate chips. Form into golf ball sized balls. Refrigerate for at least thirty minutes before eating. Store in freezer and take out as needed. This recipe is so adaptable! Add any kind of protein powder and liquid and you could add craisins or raisins. Options are endless. I made them with water! So good and about 136 calories and 6 G protein per ball. I made sixteen balls out of this recipe.

Monday, March 21, 2016

Yummy Sandwich Wraps

I made these for a school function last week (using the hummus recipe posted right below this) and they were a hit!  I kept sneaking bites before I sent them off- they are super refreshing and extremely healthy (vegan if you can find a vegan tortilla).  They were gone so fast at the event and it made a ton!  You could keep the ingredients in the fridge, ready to go if you need a quick and easy lunch, or cut small and serve a crowd.
google images
Yummy Sandwich Wraps
Suzette Larson

Tortillas 
Hummus 
Bell peppers (all colors)
Cucumber
Spinach
Deli sliced turkey (optional- omit for vegan/vegetarian)

Just spread hummus on one half of the tortilla (half-moon shape), spread the veggies lengthwise that have been cut into long, thin strips across the tortilla, throw a couple slices of turkey and roll. I spread a bit more hummus as I rolled it up to help it stick together. 

Roll it up tight and let rest while you roll the next. When you're finished rolling, start with the first one you rolled and slice diagonally, leaving off the ends. 

Friday, March 18, 2016

The Best Hummus

I've never made my own hummus before because you can pretty much get it at any store, but I went for it.  The good?  It was amazing!!!! The bad? I will never buy store-bought again and I'm forced to make my own now.  You have to go the extra step and peel the chickpeas to make this as smooth as butter- I promise it only takes a few minutes.  And, I got Tessa involved and she loved to help!  This recipe is from the Ottolenghi cookbook, which is kind of a huge deal around these parts... it is bonafide stuff.  You have to let it rest for a while, to let the flavors come together, before it reaches optimal deliciousness.
The Best Hummus

Makes 1 3/4 cups hummus

1 3/4 cups drained chickpeas (from a 15-ounce can)
1/2 cup tahini paste
2 tablespoons freshly squeezed lemon juice, or more to taste
2 small cloves garlic, roughly chopped
3/4 teaspoon table salt, or more to taste
Approximately 1/4 cup water 

Olive oil, paprika, pita wedges (brushed with olive oil and sprinkled with a combination of sesame seeds and sea salt), and/or carrot sticks [optional] to serve.

For canned chickpeas: Peel your chickpeas. I find this is easiest when you take a chickpea between your thumb and next two fingers, arranging the pointy end in towards your palm, and “pop!” the naked chickpea out. Discard the skin. 

In a food processor (I used my blendtec), blend the chickpeas until powdery clumps form, a full minute, scraping down the sides. Add the tahini, lemon juice, garlic and salt and blend until pureed. With the machine running, drizzle in water or reserved chickpea cooking water, 1 tablespoon at a time, until you get very smooth, light and creamy mixture. I find I need about 4 tablespoons for this volume, but you may need slightly more or less.
Taste and adjust seasonings, adding more salt or lemon if needed. I do recommend that you hold off on adding more garlic just yet, however. I find that it “blooms” as it settles in the fridge overnight, becoming much more garlicky after a rest, so that even if it doesn’t seem like enough at first, it likely will be in the long run.
Transfer the hummus to a bowl and rest it in the fridge for at least 30 minutes, longer if you can. To serve, drizzle it with a little olive oil, and sprinkle it with paprika. Serve it with pita wedges or carrot sticks.

Wednesday, March 9, 2016

Saucy Lentils and Veggies


Ok, I know this isn't the most exciting recipe title.  I combined two different recipes to make a meal...because two side dishes count as a full meal in my house! The first is a recipe for lentils in a sort of tomato sauce, and the second is roasted veggies.  The recipes are meant to be separate, but I stirred them together (after cooking separately) and it made my mouth sing! I loved it so much, that I made it twice in one week!  (My kids didn't love the roasted veggies, if I'm being honest- but what kid does?!  They were forced to eat a serving anyway.  And, they really liked the lentils!).  This is a great, fantastic, healthy meal that you can store in the fridge for several days and have it for lunch for the whole week- or thats what I did (saves you from that lunchtime rut)!  Also, I got these recipes from an IG account, "gotorecipes" that is super good- you HAVE to follow her!!

**Slight Edit: I just re-made this and served it over rice (as pictured above) and then went out on a limb and added avocados sprinkled with salt and pepper....soooo good!

Saucy Lentils
Adapted slightly from "gotorecipes"


1 yellow onion, diced 


1 Tablespoons olive oil

1 teaspoon Kosher salt

1 teaspoon pepper

4-5 cloves garlic, minced

2 - 15 oz. cans diced tomatoes with liquid

1 bunch thyme leaves (or tied with a string)

1 lb. bag lentils

3 cups vegetable broth (can use chicken broth too)


(Optional)

Rice, cooked


Diced avocados, sprinkled with s&p

In large pot, sauté onion in olive oil until soft with salt and pepper until golden brown. Add garlic and cook 30 seconds. Add chicken broth, tomatoes with liquid, thyme and lentils and bring to a boil. Reduce heat to low and cover until liquid is absorbed, about 35 minutes (stir occasionally). Remove thyme sprigs before serving, if used. 


Roasted Veggies
Adapted slightly from "gotorecipes"

Carrots, diced
Sweet potatoes, diced
Thyme (fresh or dried)
Olive oil
Salt and Pepper
Brown sugar 
Maple Syrup

After dicing veggies to same sizes, sprinkle brown sugar and a couple of teaspoons of syrup along with the rest of the ingredients together (just season to liking). Spread evenly on foiled-lined pan and cook at 425F for about 30 minutes.  Once done, you can combine with the above lentils for a delicious combo.

Monday, March 7, 2016

Junior's Cheesecake Copycat Recipe


You may not know this about me (if you don't, then, sorry, but you don't know me very well), but I love cheesecake. I requested it for every birthday growing up, and my sweet mom usually delivered. My favorite for many years has been Godiva Chocolate from the Cheesecake Factory. And I've spent way too much time in NYC searching for the very best NY cheesecake. So last December when I took Madi to NYC for her birthday, I knew a cheesecake hunt would be on the agenda. As we were headed to see Les Miserables at Times Square, we happened to noticed this place called Junior's practically across the street from our theater. And they happened to claim to sell the "world's best cheesecake." Since the line was kinda long, we decided to wait until after the show to grab some. We enjoyed our show immensely and bolted for Junior's as soon as it was over. The line was even longer, but that's a good sign. So I determined to wait, and let me tell you, the wait was worth it! I came home with a couple slices of the very best cheesecake I've ever had (ok, to be completely honest, I'd still take a slice of the Godiva any day, but it certainly has met it's rival here)! So when I found this copycat recipe a few weeks later, I couldn't wait to make it. It just took me a couple of months to plan ahead to get the ingredients and make it the night before because it should refrigerate overnight. So...start planning now!

Note: The recipe I found didn't show the spongy Junior's crust recipe, so I made a graham cracker crust. I borrowed the crust and steam bath (to prevent cracking) idea from Mel's Kitchen Cafe Key Lime Cheesecake here: http://www.melskitchencafe.com/amazing-key-lime-cheesecake/. Make and bake the crust just like her recipe says, and then follow my instructions below. (My Junior's recipe calls for a water bath, but I was too scared to cook my delicate cheesecake in a big pan of water, so I used her steam bath method, and it worked great. I'll write those instructions below instead of the water bath.)

Junior's Cheesecake Copycat

Four 8-ounce packages cream cheese (use only full-fat) at room temperature
1 2/3 cups sugar
1/4 cup cornstarch
1 Tbs. vanilla
2 extra large eggs
3/4 cup heavy whipping cream

1. Preheat oven to 350. (You will bake the crust at 300, so just turn up the oven when done).
2. Put one package of cream cheese, 1/3 cup of the sugar, and the cornstarch in a large bowl, and beat with an electric mixer on low speed until creamy, about 3 minutes, scraping down the bowl several times. Blend in the remaining cream cheese.
3. Increase the mixer speed to medium and beat in remaining 1 1/3 cups sugar, then the vanilla. Blend in the eggs, one at a time, beating well after adding each one. Beat in the cream just until completely blended. Be careful not to overmix as you don't want too much air in the batter! 
4. Place a metal 9x13 (or similar size) pan on the bottom rack and pour in 2-3 cups of boiling water. Immediately place the cheesecake on the upper rack (the two racks should be spaced as she describes in the crust-baking section of her recipe) and bake until the edges are light golden brown and the top is slightly golden tan, about 1 to 1 1/4 hours. 
5. Remove the cheesecake and transfer to a wire rack and let cool for 2 hours. Don't move it. Then, leave the cake in the pan, cover loosely with plastic wrap, and refrigerate until completely cold, preferably overnight or at least 4 hours.
6. I made a fruit topping to go with mine, which is also Mel's recipe found here: 
Fresh, juicy fruit works great (sliced strawberries, blueberries, etc); if you want a simple fruit sauce recipe combine 2 cups fresh or frozen fruit, 1/4 cup sugar, 1 tablespoon cornstarch, and 1-2 teaspoons lemon juice in a saucepan. Simmer, stirring often, until thick and syrupy (you may need to increase or decrease the sugar as needed depending on the fruit as well as adding a little water, a couple tablespoons at a time, if it is overly thick).